| Tips on tapping Aluminum | Holding a hex nut in a tight place |
| Placing washer or nut in a tight place | Fastening nut to chassis |
| Testing bipolar transistor with ohmmeter |
Tapping aluminum can be difficult. The tap often binds and may break off, both ruining the tap and marring or ruining the piece being worked.Here are some styles of tap I have used in the past:
Flutes are the grooves between the rows of threads.  The common tap has straight flutes, and may
have two, three, four, or more, depending on its size.

A Gunn tap has two straight flutes, and is ground for production work. It cuts a curl, rather
than chips, and pushes it ahead of itself.  The curl continues out the other side. For
hand work, these do well, but you need to remove the curl from the bottom of a blind hole.

A spiral fluted tap, readily available from machine shop supply houses, has flutes that
are not straight - they're spiraled!  Think of a common 1/4" drill.  It usually has two flutes,
and it is a twist drill - the flutes are spiraled like a coarse screw thread. A spiral
fluted tap is very similar, except the high parts of the drill have a fine thread cut into them.
It cuts a curl that enters the flutes and is pulled back toward the tap wrench.  I had a single
3/8-24 spiral fluted tap in a production operation that tapped over 2500 holes through a 2"
aluminum hex nut before I ran out of work.  It was still in good shape!

Gunn and spiral fluted taps are available from most any machine shop supply house, and some
larger hardware supply firms. Ask. If you can't find a source, e-mail me: I'll pass on the
phone number of a local supplier where I buy mine.
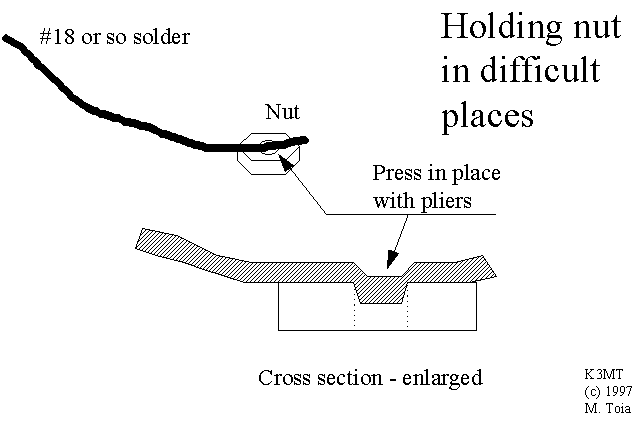
Finger extender to hold nuts in a tight place
Sometimes when working on electronic devices, you'll run into a situation where you must put a
nut on a screw, deep inside the apparatus.  All manner of capacitors, PC boards, transformers,
etc. are in the way: you need a very long, skinny, bendable finger extension to do this.

Here's a neat trick.  Just get some heavier gauge solder. Put the end over the nut so it
straddles the nut's hole.  Squeeze the solder with a plier fairly tightly: some of it will
extrude into the nut's hole and onto its threads.  Here's a sketch of the idea.
Unroll some more solder, bend it around the way you have to, and snake it through the guts
of the apparatus until it is lined up over the screw hole.

Now start the screw into the hole gently, and turn it gently so it starts into the nut's threads.
It will push the solder back out.  You can now use the end of the solder to spin the nut onto
the screw until it begins to snug up.  Then, with a long screwdriver, wedge the nut against the
chassis, and turn the screw with another screwdriver until the nut is firmly seated.
How to slide a washer or nut onto a screw
How can you put a washer and/or nut on a screw down inside a difficult spot?  While the screw
may be easy to insert into a hole, the other side of the hole may be impossible to reach
with fingers or pliers.

You can put the nut or washer in place by first turning the overall object so that the screw is
pointing "up."  Then slide the washer or nut, or both, on some solder (or copper wire).  Pull the
solder out far enough that you can get it to contact the top of the screw.  Hold the washer
and/or nut on the solder with your finger while you snake the solder down into the apparatus,
to touch the end of the screw.  Then let the nut/washer go: they will slide down the solder and
onto the screw.  This sketch demonstrates the idea.
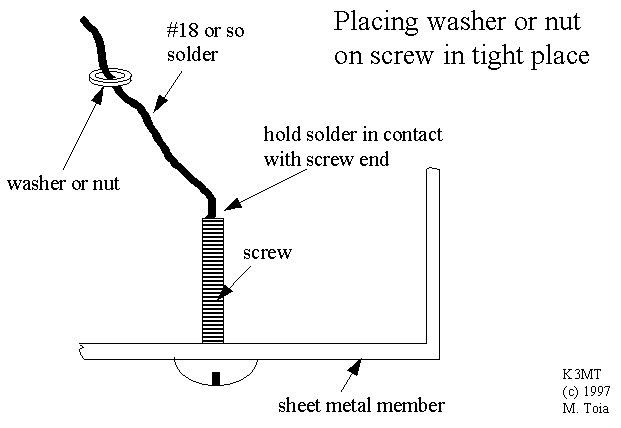
Turn the nut with another piece of solder or a long screwdriver until it starts onto the screw,
then remove the solder.  Continue working the nut onto the screw until it begins to snug up.
Then finish tightening the screw with a standard screwdriver.
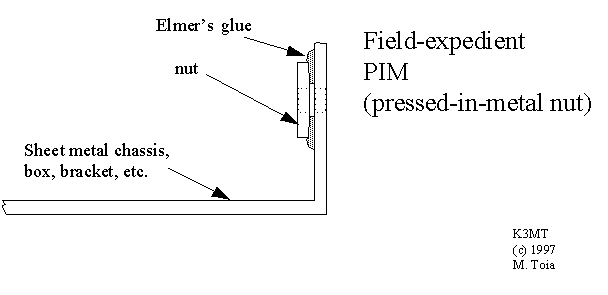
Sometimes when building electronic stuff your life would be easier if you could thread an already
drilled hole.  In metalwork, a pressed-in-metal nut - a PIM - is often used at this time.
You can roughly approximate this trick by using some Elmer's glue to hold a nut onto a chassis
or other sheet metal part.  This sketch shows the idea:
Ohmmeter tester for bipolar transistors
A bipolar transistor has two internal junctions: a base-emitter and a base-collector junction.
In an NPN bipolar, the base-collector junction is reversed biased when the collector is
more positive than the base.  It behaves as if it were a diode.  Indeed, it can be used as a
diode!

The base-emitter junction is normally operated forward biased.  It, too, behaves as if it
were a single diode.

Both base-collector and base-emitter junctions can be considered as if they are diodes.  For NPN
transistors, the base is the cathode.  This sketch demonstrates the dual-diode nature
of NPN and PNP bipolar transistors.
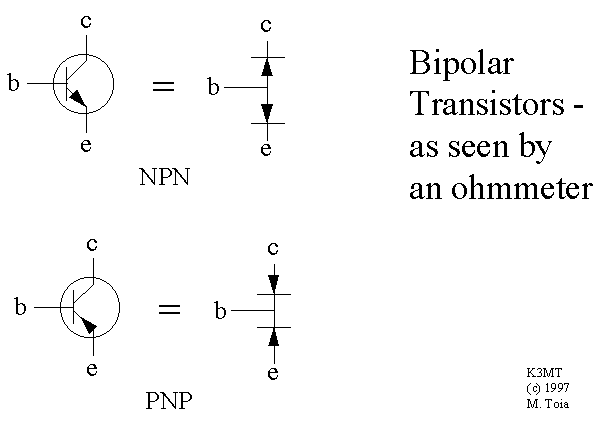
Notice that a PNP transistor has the diodes turned around - the base is the anode of both
junctions.

An ohmmeter connected between base and collector, or base and emitter, will show if these two
diodes are functional.  Just try the ohmmeter in the forward and reversed biased connections
on the two junctions.  If they do not behave as diodes, the transistor is probably bad!
If they do, note the polarity for low and high resistance - this will identify whether the
transistor is NPN or PNP.

A common failure in bipolars - called punchthrough - happens when the emitter contacts the
collector with a short-circuit path through the thin base region.  An ohmmeter will detect this
by showing a short from collector to emitter.

Another trick for common, low-power transistors, is to connect the ohmmeter to the collector and
emitter, leaving the base hanging open.  Apply polarity so the collector will be reverse biased
(positive for NPN, negative for PNP.)  Now wet a finger and thumb.  Hold the base and collector
leads in this finger/thumb clamp (don't let them touch).  This injects some current into the
base.  If the ohmmeter resistance reading decreases, the transistor is working.
By holding the base and emitter leads between thumb and finger, the resistance should go
up/

These simple tests often tell if you have a PNP or NPN transistor, and if it is good or bad.
K3MT