Astertest is a Windows application that can test the
CPU load of your Asterisk PBX server. In order to use it you must
have advanced knowledge in VoIP. To complete the test you must have
an Asterisk PBX server that originates the calls and one more
Asterisk server which to be tested. You can download the application
from
http://astertest.com/downloads/. You will need
most of the things there. Let us start doing the things one by
one.
1.Select the serversYou must have clear
idea which machine will be used as Origination server and which one
as Test server.
2.Audio FilesThe audio files
are stored in
/usr/src/asterisk/sounds/. Copy
astertest-rtp.gsm from
http://astertest.com/downloads/ to the Origination
server. On the Test server you have to copy all the sound file
formats you wish to test. For alaw you need some *.alaw audio file
for example -
ast-test-al.al. You can use your own files with
different name, but make sure when you configure the
extensions.conf on the Test server to use the correct audio
file name with the Playback command,
ast-test-gsm.gsm for gsm
tests,
ast-test-ul.ul for ulaw,
ast-test-ilbc.ilbc
etc. Now when you have the audio files for the test you have to
implement some new modules in asterisk that will give you the
information for the actual CPU load while testing.
3.New
Asterisk ModulesThe modules below must be installed on
both Asterisk servers:
app_securax_cpuinfo.c
app_securax_serverload.c
securax_utils.c
securax_utils.h
Copy
these files in
/usr/src/asterisk/asterisk/apps/ on both
Origination server and Test server.
4. Changing the
applications MakefileNow Asterisk has to be told that
these modules really exits and they have to be loaded. For this
purpose you have to change the
Makefile in
/usr/src/asterisk/asterisk/apps/. Open the
Makefile
that you have downloaded and copy the bolded lines to their
corresponding places in the original
Makefile.
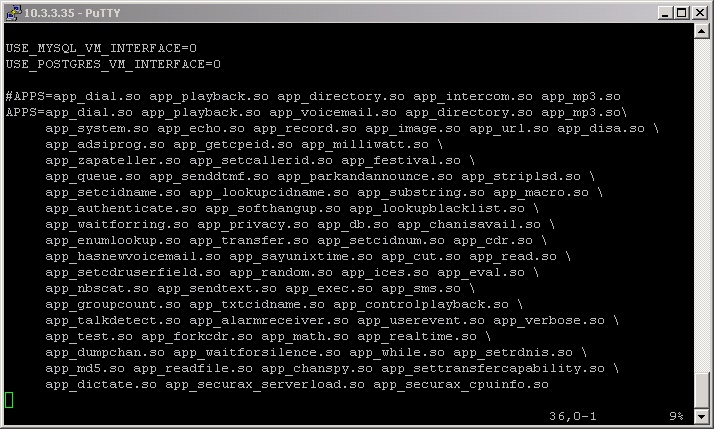
So you
have to add these two modules in the beginning in APPS -
app_securax_serverload.so and
app_securax_cpuinfo.so
here is how this part of your Makefile has to look after you change
it.
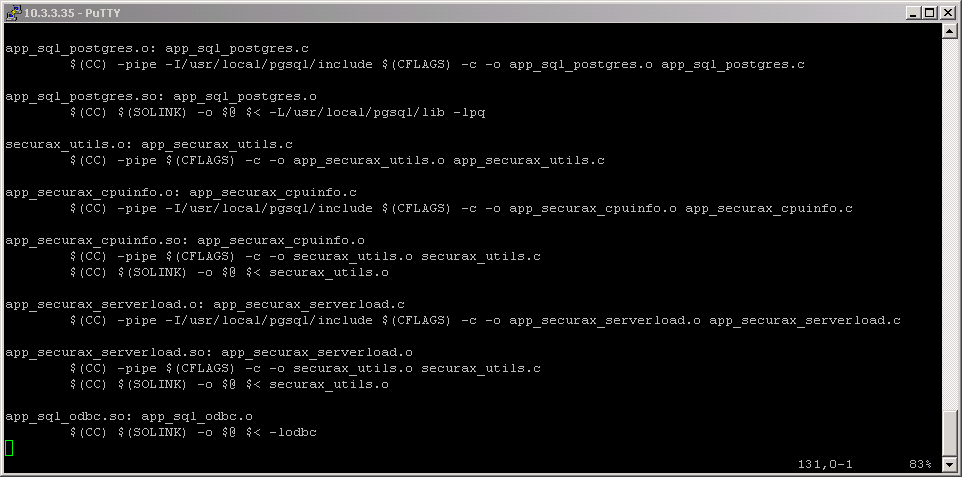
Further on you have to add the following module
definitions (this is used when you compile Asterisk).
securax_utils.o: app_securax_utils.c
$(CC) -pipe $(CFLAGS) -c -o app_securax_utils.o
app_securax_utils.c
app_securax_cpuinfo.o:
app_securax_cpuinfo.c
$(CC) -pipe -I/usr/local/pgsql/include $(CFLAGS) -c
-o
app_securax_cpuinfo.oapp_securax_cpuinfo.c
app_securax_cpuinfo.so:
app_securax_cpuinfo.o
$(CC) -pipe $(CFLAGS) -c -o securax_utils.o
securax_utils.c
$(CC) $(SOLINK) -o $@ $<
securax_utils.o
app_securax_serverload.o:
app_securax_serverload.c
$(CC) -pipe -I/usr/local/pgsql/include $(CFLAGS) -c
o app_securax_serverload.o
app_securax_serverload.c
app_securax_serverload.so:
app_securax_serverload.o
$(CC) -pipe $(CFLAGS) -c -o securax_utils.o
securax_utils.c
$(CC) $(SOLINK) -o $@ $<
securax_utils.o
Here is how this part of the
Makefile should look after you change it:
You have to change this Makefile in both Origination
and Test server. In order these changes in the Makefile to take
effect you have to recompile the Asterisk on both of the
servers.
5.Re-compiling AsteriskGo to the
Asterisk source - /usr/src/asterisk/asterisk and recompile
it.
cd /usr/src/asterisk/asterisk
make
make
install
Now your Asterisk servers have the modules
implemented. We have now to add just some more things in the
managers.conf and securax_serverload.conf files
(/etc/asterisk)
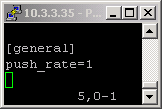
6.Configuring securax_serverload.conf
This file also has to be downloaded to
/etc/asterisk/. You can also create file with same name in
the mentioned directory and write in the data needed. Here is how
you can do it:
cd /etc/asterisk
vi
securax_serverload.conf
[general]
push_level=1
This
file has to exist again on both Origination and Test
servers.
 7.Configuring managers.conf
In this
file which is placed in
/etc/asterisk you have to create a
user on the Origination server and one on the Test server, so you
should have users on both servers in
managers.conf. When you
start the application and before beginning a test you will be
prompted to provide username and password for each server
(Origination and Test). This is username and password for the
relevant user in /etc/asterisk/managers.conf. Below you can see my
configuration.
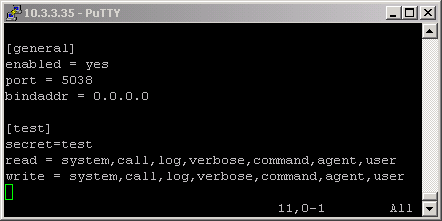
Above the
[general] account is disabled by
default i.e.
enabled = no. So first you have to change this
to yes. Then you have to create an account.
[test]
this is the
username
secret=test
the password is set to
test
read=system,call,log,verbose,command,agent,userwrite=system,call,log,verbose,command,agent,user
this is authorization level for the user for the
various classes
You need to add some users
and extensions to servers now.
8.Configuring
iax.confAstertest uses some certain users for the test.
Here is what you have to add to Asterisk Test servers, no specified
users are needed for the Origination server. Here are the users you
have to add to
/etc/asterisk/iax.conf on the server you are
going to test.
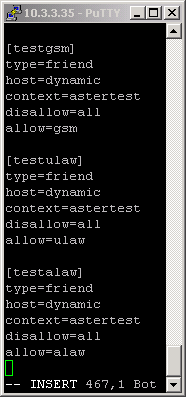
Here is the complete list of all users you can have.
For every audio codec format you want to test you must have separate
user.
[testg723]
type=friend
host=dynamic
context=astertest
disallow=all
allow=g723
[testgsm]
type=friend
host=dynamic
context=astertest
disallow=all
allow=gsm
[testulaw]
type=friend
host=dynamic
context=astertest
disallow=all
allow=ulaw
[testalaw]
type=friend
host=dynamic
context=astertest
disallow=all
allow=alaw
[testg726]
type=friend
host=dynamic
context=astertest
disallow=all
allow=g726
[testadpcm]
type=friend
host=dynamic
context=astertest
disallow=all
allow=adpcm
[testslin]
type=friend
host=dynamic
context=astertest
disallow=all
allow=slin
[testlpc10]
type=friend
host=dynamic
context=astertest
disallow=all
allow=lpc10
[testg729]
type=friend
host=dynamic
context=astertest
disallow=all
allow=g729
[testspeex]
type=friend
host=dynamic
context=astertest
disallow=all
allow=speex
[testilbc]
type=friend
host=dynamic
context=astertest
disallow=all
allow=ilbc
9.
Configuring extensions.confAstertest also needs some
certain extensions on both the Origination and the Test server. This
file is in
/etc/asterisk/.
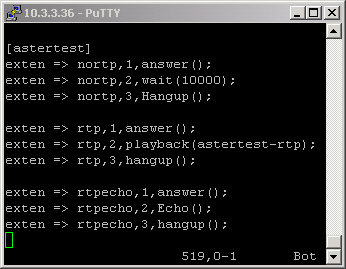
Origination
ServerThis context and extensions have to be added
in among your extensions.
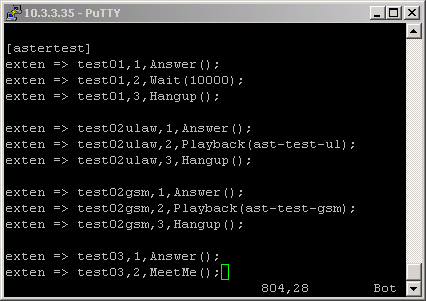
 Test Server
The following
context has to be added in extensions.conf of your Test
server.
Now you have all the things you need to start the
test. Restart Asterisk on both of the servers and then enter the
command line (CLI). To make sure that the new modules are working
check if they are loaded. Type in CLI
show modules and if
app_securax_serverload.so and
app_securax_cpuinfo has
a corresponding 1 that means they are loaded. Another way to check
this is to type
show modules like app_securax this will
again show you the modules with that name. Every module will have
value 0 if it is not loaded and 1 if it is loaded. So if everything
seems correct we may start the test itself, and if you have some
problems check whether you followed precisely the steps
above.
As you see above you need to have separate extensions
for the different users, so as in my file not all possible
extensions are used, here is the full list of extensions for all the
users.
exten => test02g723,1,Answer();
exten =>
test02g723,2,Playback(ast-test-g723);
exten =>
test02g723,3,Hangup();
exten =>
test02gsm,1,Answer();
exten =>
test02gsm,2,Playback(ast-test-gsm);
exten =>
test02gsm,3,Hangup();
exten =>
test02ulaw,1,Answer();
exten =>
test02ulaw,2,Playback(ast-test-ul);
exten =>
test02ulaw,3,Hangup();
exten =>
test02alaw,1,Answer();
exten =>
test02alaw,2,Playback(ast-test-alaw);
exten =>
test02alaw,3,Hangup();
exten =>
test02g726,1,Answer();
exten =>
test02g726,2,Playback(ast-test-g726);
exten =>
test02g726,3,Hangup();
exten =>
test02adpcm,1,Answer();
exten =>
test02adpcm,2,Playback(ast-test-adpcm);
exten =>
test02adpcm,3,Hangup();
exten =>
test02slin,1,Answer();
exten =>
test02slin,2,Playback(ast-test-siln);
exten =>
test02siln,3,Hangup();
exten =>
test02lpc10,1,Answer();
exten =>
test02lpc10,2,Playback(ast-test-lpc10);
exten =>
test02lpc10,3,Hangup();
exten =>
test02g729,1,Answer();
exten =>
test02g729,2,Playback(ast-test-g729);
exten =>
test02g729,3,Hangup();
exten =>
test02speex,1,Answer();
exten =>
test02speex,2,Playback(ast-test-speex);
exten =>
test02speex,3,Hangup();
exten =>
test02ilbc,1,Answer();
exten =>
test02ilbc,2,Playback(ast-test-ilbc);
exten =>
test02ilbc,3,Hangup();
10. Starting
Astertest
1.Run the application -
astertest.exe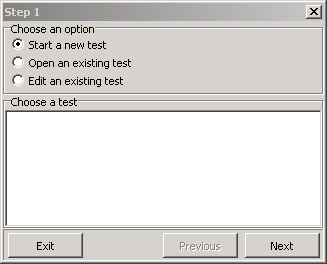
Here you can start new test, make again an existing
test or edit an existing test. Choose Start a new test and click
Next.
2.Choose type and name for the
test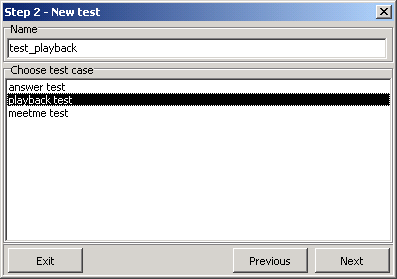
Type the name you want to give to the test in the
Name field at the top and choose type (answer, playback or meetme)
for the test. When done click Next.
3.Provide
information for the servers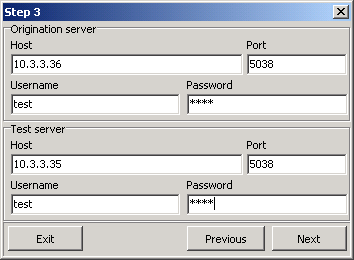
In the Origination server part type the IP address
for the Origination server, leave the port as by default 5038.
Then type the username and password that you created in
managers.conf on the corresponding Asterisk server.
In
the Test server part type again the IP of the Asterisk server that
you are going to test and the username and password for the user you
created in
managers.conf on the relevant server. When done
click next to proceed.
4.Final adjustments for the
test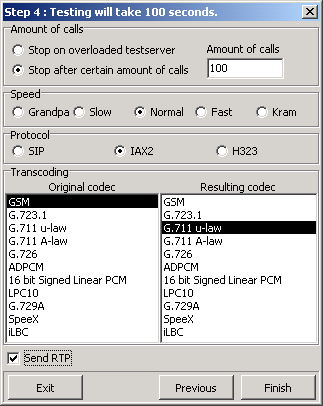
On the top check the amount of calls you want to do
while testing test till overload of the tested server or test
certain amount of calls. I will run the test for a hundred
calls.
Speed is the speed of origination for the calls.
Normal is approximately 1 call in a second.
Protocol is the
protocol type that asterisk will use. As we registered our users in
iax.conf we have to use IAX2 protocol for the test.
In
Transcoding you have to choose codec for the origination server and
for the tested server. There will be no transcoding if you choose
the same codecs for original and resulting codec.
At the
bottom check Send RTP this way the media file will be send. If
you do not check it you will have just answer in the test, without
real voice pressure over the server.
When done click Finish
to start the test.
5.Testing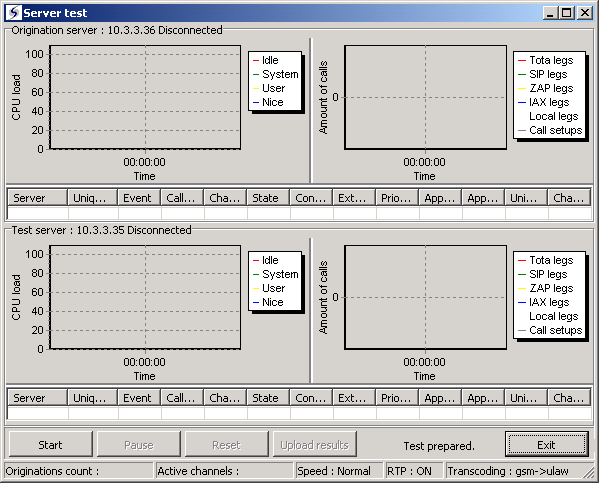
This is the test ready to be started, just click
Start to run the test.
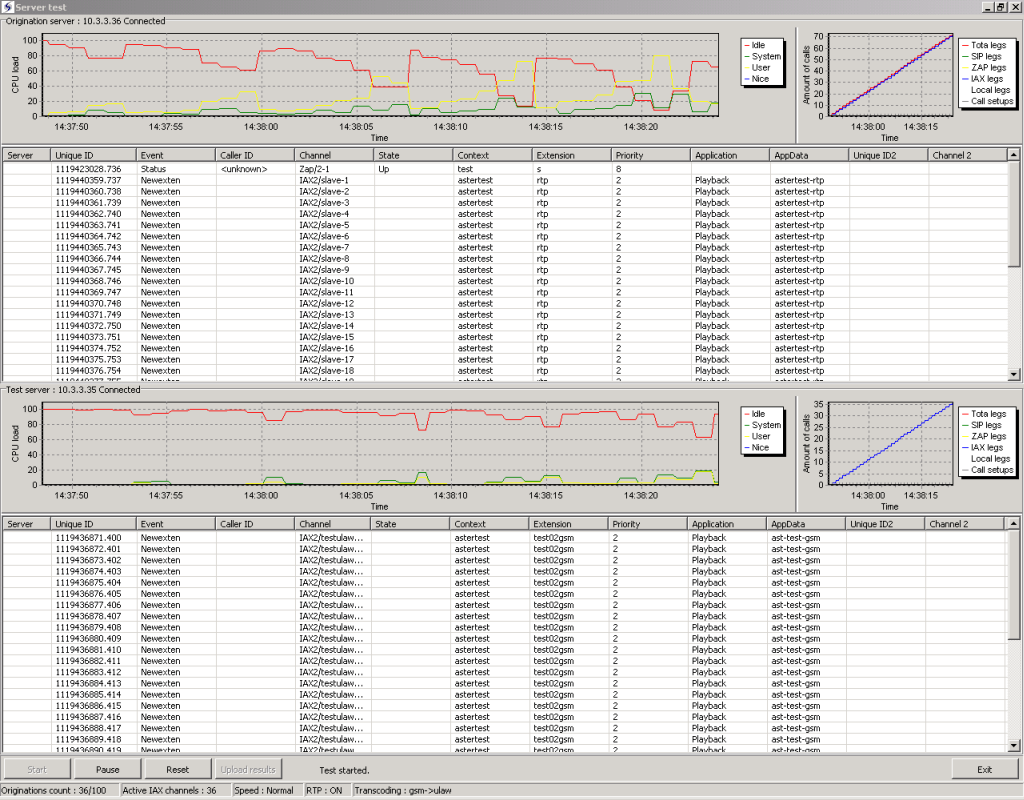
At the upper part you can see information for the
origination server calls at the moment (on the small graph on the
left), CPU load (the graph on the right, showing Idle load, system
load, user load), and below more information for the calls made and
channels used at the moment.
At the bottom part you see the
same information for the test server.
While the test is
executed you can magnify the CPU load graph. You can do this by
clicking left mouse button and move left to right. Here is a
magnified graph.

When you again click the left mouse button and move
the mouse from right to left at the same time and the graph will be
minimized to its normal size.

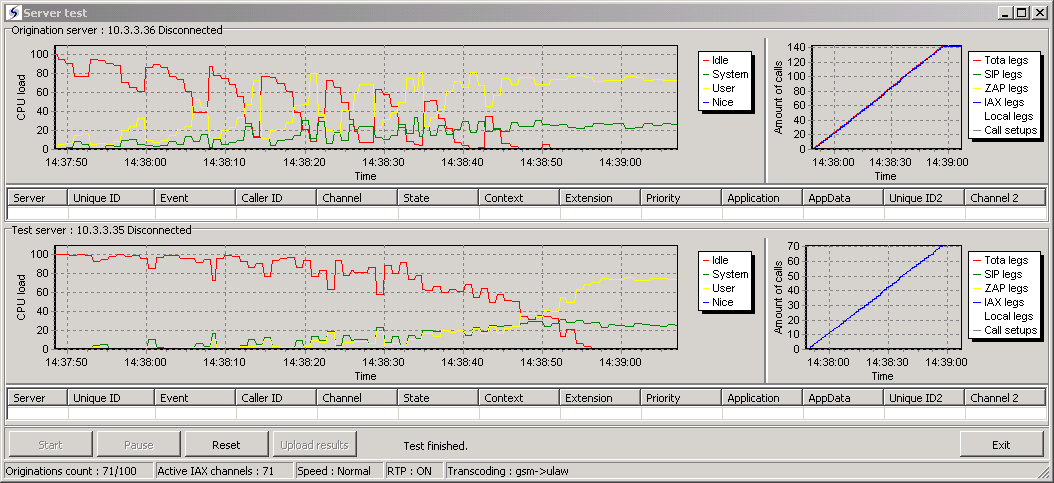
When the test is done the calls reach the certain
amount you wanted or the server is overloaded the test is done. Then
the calls are unloaded. Here you see a progress bar while all the
calls are hanging up.

Then you can see the graph from the test.
You now have the test and when you run again
Astertest, you can redo the test without doing the settings again
(step 1 to 4), or you can also change a little bit the test for
example increase or decrease the amount of calls, change the codec,
etc.
User Comments
Add
Comment

