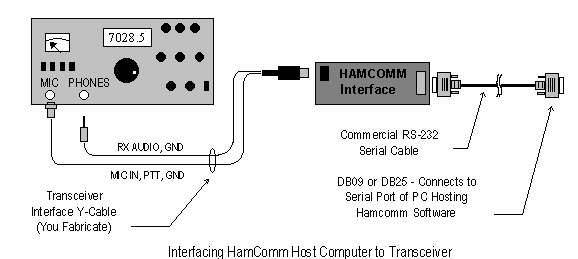
Three connections are required to interface the HamComm hardware with your transceiver. They are:
- Receive Audio (RX)
- Microphone Audio (TX)
- Push to Talk (PTT)
The diagram shows the RX audio connection being made via the transceiver's headphone jack. If this approach is used, it will be necessary for the operator to partially insert the male phone plug until it just touches the contacts inside the connector, but not so far as to mute the speaker (which provides essential aural tuning cues to the operator). An alternative approach is to parallel the RX audio connections of the HamComm interface with the transceiver speaker lines. The interface hardware isn't particularly fussy about impedance matching or audio levels, so either approach should work fine provided that the ground lead of the interface hardware is connected to the grounded speaker lead from the transceiver (and not cross-connected). The RX connection may be made with either a twisted pair or shielded wiring.
The TX and PTT connections are most easily implemented with a single two conductor, shielded cable which has a connector on one end identical to that of your microphone. The ground for both circuits are common, so just tie the ground of your HamComm interface circuit to the shield, and use the remaining two wires for Mic audio and PTT. If you aren't sure of the microphone connector pin-out, look in the instruction manual for the transceiver.
On the data side of the Interface, a commercially available serial cable connects between the HamComm interface and the selected COM port of the computer hosting HamComm. As noted previously, no external supplies are required - power is derived from the computer's serial lines.
Additional Notes:
The diagram above shows a 5-pin DIN connector on the interface end of the transceiver cable rather than the RCA phone and phone jack plugs specified in the schematic diagram and parts list. (The DIN connector was used in an improved version of the HamComm interface that I developed, and this diagram is lifted from the documentation for that circuit.)
The HamComm documentation makes an issue of keeping the length of the RS-232 cable between the interface and host computer as short as possible. Not to worry - I've used cables 6 - 8 ft long with absolutely no problems. Just make sure that the cable you select is shielded - don't try to use flat ribbon cable.
The HamComm software has provisions for selecting one of several COM ports on your computer to communicate with the interface hardware. For initial check-out, I recommend that you use a known good port. For instance, if you use a serial mouse plugged into the COM1 port, use that port for check-out. After you get everything sorted out, you can always shift ports to a spare which doesn't deprive you of your mouse or external modem.